

The bright, unforgiving desert sun in El Paso is the harshest critic your interior walls will ever face. Having the drywall finishing levels explained is the only way to ensure your home looks its best when that intense natural light pours through your windows. Many homeowners assume that “finished” simply means ready for paint, but there is a significant difference between a wall meant for a hidden closet and one destined for a high-gloss living room. Understanding these technical standards prevents you from overpaying for unnecessary labor or being disappointed by visible seams and “flashing” after the project is complete.
It’s natural to feel frustrated by confusing contractor jargon when you’re just looking for a smooth, professional result. You want a home that stands up to scrutiny; you shouldn’t have to be a construction expert to achieve that. This guide will help you master the industry standards for drywall finishing to ensure your next El Paso remodeling project looks flawless under any lighting. We’ll walk through the specific requirements for levels 0 through 5, explaining exactly where each one belongs in your home and how to specify the right finish to your contractor with absolute confidence.
Key Takeaways
- Learn how the GA-214 industry standards serve as a vital communication tool between you and your contractor to ensure your project expectations are met.
- Identify why levels 0, 1, and 2 are strictly reserved for hidden structural areas like attics or service corridors rather than visible living spaces.
- Having the drywall finishing levels explained helps you select the right surface preparation for your paint sheen, from Level 4 standard walls to Level 5 high-gloss finishes.
- Understand how El Paso’s intense natural light can expose minor wall flaws and why specific finishing levels are required to prevent “flashing” and visible seams.
- Discover why professional application is essential for seamless home additions that must blend perfectly with your existing interior architecture.
What Are Drywall Finishing Levels and Why Do They Matter?
Drywall finishing isn’t a matter of opinion; it’s a matter of technical standards. These standards, known as the GA-214 code, were established by the Gypsum Association to provide a universal language for the construction industry. When you have the drywall finishing levels explained clearly, you can move past vague terms like “smooth enough” and use specific numbers that every professional understands. This precision is vital because each level requires a different amount of joint compound and labor. Choosing the wrong level often leads to “joint flashing,” a common issue where the texture of the tape joint looks different from the rest of the wall once the paint is applied.
The Origin of the 0-5 Scale
The 0-5 scale exists to eliminate the guesswork and disputes that once plagued residential projects. Before these standards, homeowners and contractors often disagreed on what a “finished” wall actually looked like. The Gypsum Association created these tiers to define exactly how many coats of joint compound are needed and how much sanding is required. This becomes especially critical in El Paso homes due to “critical lighting.” This term refers to light that hits a wall at a sharp angle, such as sunlight from a large window or recessed ceiling lights. Without the correct finish level, these light sources will cast long shadows across every minor imperfection in your drywall.
Drywall Finishing vs. Drywall Hanging
Many people use these terms interchangeably, but they represent two different skill sets. Drywall hanging is the structural phase where large gypsum boards are secured to the framing; this is essentially Level 0. Finishing is the meticulous process of taping, mudding, and sanding those joints to create a seamless surface. It’s where the true artistry of the trade resides. In El Paso’s competitive real estate market, a high-quality finish significantly impacts resale value. Prospective buyers notice the difference between a wavy, amateurish wall and a professional, level-standard surface that looks perfect under the midday sun.
The level you choose dictates the number of “coats” or layers of joint compound applied. Consider these common outcomes of a poorly chosen finish level:
- Visible Seams: Light catches the edge of the drywall tape because it wasn’t feathered out far enough.
- Shadowing: Small dips or humps in the mud create dark spots when viewed from the side.
- Texture Mismatch: The paint absorbs differently into the paper than it does into the mud, creating a “flashing” effect.
By getting the drywall finishing levels explained before your project starts, you ensure that the final product matches your vision for a flawless interior. It’s about matching the effort to the environment, ensuring you don’t overpay for hidden areas while investing where it counts.
Levels 0, 1, and 2: The Structural and Hidden Finishes
The first three stages of the 0-5 scale are primarily functional. While the higher tiers focus on aesthetics, these levels prioritize structural integrity and safety. Having the drywall finishing levels explained at this foundational stage helps you understand why your contractor might suggest a lower level for a storage area or a garage. These stages are not meant for living spaces where you’ll be applying paint or wallpaper, as they do not hide the seams or fasteners effectively.
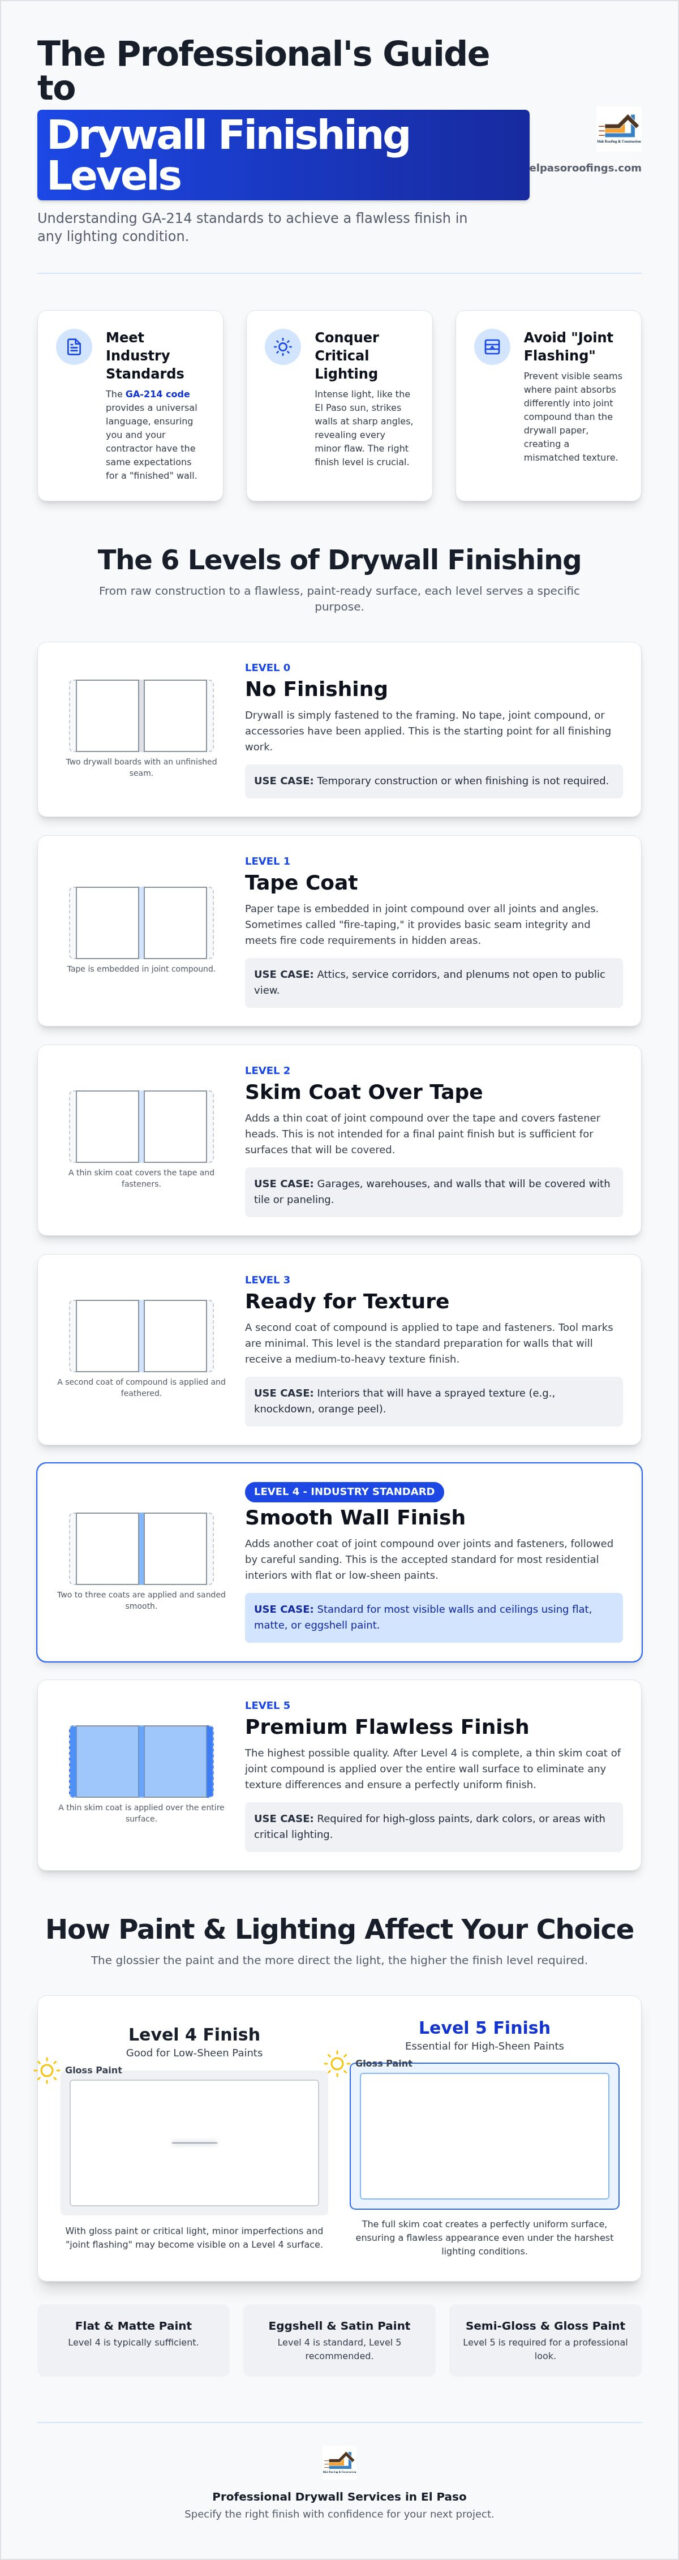
Level 0 is simply the installation of the drywall boards. No tape, beads, or joint compound are applied. This is the raw state of a project where the gypsum boards are fastened to the framing. Level 1 introduces tape embedded in joint compound at all joints and interior angles. Often called “fire taping,” this level is used in areas like plenums or service corridors where smoke and fire resistance are required by building codes, but the wall is hidden from public view.
Level 2 is a significant step up from fire taping. It requires a thin coat of joint compound over all joints and fasteners, with the tape wiped smooth. This level is sufficient for any area where the final appearance is not a concern, or where the surface will be covered by another material entirely.
When Level 2 is the Right Choice
Level 2 is the industry standard for garages, warehouses, and storage sheds in El Paso. It provides a basic seal without the labor-intensive sanding required for interior living rooms. It’s also the essential prerequisite for areas where you plan to install heavy tile or stone veneer. Because the tile covers the wall completely, spending extra on a Level 4 finish would be an unnecessary expense. If you’re looking to manage costs on a large-scale project, professional drywall installation can help you identify which utility areas can stop at Level 2.
The Technical Requirements of Fire Taping
Building codes in El Paso often require Level 1 finishing as a smoke barrier in specific commercial or multi-family residential structures. In these scenarios, the tape must be fully embedded in the compound to prevent air and smoke from passing through the seams. Unlike higher levels, the fasteners do not need to be covered, and the compound doesn’t need to be smooth. The focus remains entirely on meeting safety regulations rather than visual perfection. Achieving this requires a steady hand to ensure the tape is set correctly without air bubbles, which could compromise the integrity of the barrier over time.
Levels 3, 4, and 5: Achieving the Perfect Interior Surface
As we move into the visible living areas of your home, the technical requirements for smoothness increase significantly. Having the drywall finishing levels explained for these upper tiers is essential because the choice you make here directly impacts the final look of your paint or texture. While levels 0 through 2 focus on fire safety and structural stability, levels 3, 4, and 5 are where the visual quality of your El Paso remodel is determined.
Level 3 is specifically designed for areas that will receive a heavy texture, such as knockdown or orange peel finishes common in Southwest architecture. At this stage, the tape is embedded and one additional coat of joint compound is applied to the joints and interior angles. Because the heavy texture will hide minor imperfections, the surface doesn’t need to be perfectly smooth. Professionals often use an all-purpose joint compound for its strong bonding properties during this phase, as it provides a durable base for the subsequent texture application.
Level 4: The Residential Gold Standard
If you’re planning to use flat, eggshell, or satin paint in your bedrooms and hallways, Level 4 is the industry standard you should request. This level involves the tape, a bed coat, and a final finish coat over all joints and fasteners. Each layer is sanded smooth to ensure that no tool marks or ridges remain. Many contractors switch to a lightweight topping compound for the final coat because it sands easily and creates a finer finish. Level 4 is the point where drywall becomes “paint-ready” for most standard sheens used in modern residential projects.
Level 5: The Skim Coat Secret
For the most demanding environments, Level 5 provides a premium, gallery-quality finish. This level is necessary if you plan to use high-gloss paints or if the room features large windows that create “critical lighting” conditions. Beyond the standard coats of Level 4, a Level 5 finish includes a full skim coat over the entire surface of the wall. This skim coat can be applied with a trowel or specialized spray equipment. Its primary purpose is to mask the difference in porosity between the drywall paper and the joint compound. Without this step, the paint may absorb unevenly, leading to a blotchy appearance known as “flashing.” By creating a uniform surface across the entire wall, Level 5 ensures that your finish remains flawless even under the most intense El Paso sun.

How Lighting and Paint Sheen Dictate Your Choice
Your choice of drywall finish depends heavily on the environment and the final coating. While we have already had the drywall finishing levels explained in terms of coats and compound, the visual success of the project relies on how light interacts with the surface. Light doesn’t just illuminate a room; it exposes every microscopic ridge and valley on your walls. If you plan to use a dark color or a high-sheen paint, the preparation must be more rigorous to prevent shadows from making a wall look “wavy.”
The role of shadows is the most critical factor in determining if a wall looks smooth. Even a wall that feels flat to the touch can look irregular if the lighting is positioned poorly. This is why professional finishers often use “task lighting” or high-intensity lamps held at an angle during the sanding process. It mimics the worst-case lighting scenarios your home will face, ensuring the surface is truly ready for its final finish.
El Paso’s Desert Light Challenge
El Paso presents a unique challenge due to the intensity of the high-desert sun. Large, south-facing windows are a staple of local architecture, but they create “raking light.” This occurs when sunlight hits a wall at an acute angle, stretching shadows across the surface and highlighting even the smallest imperfections. In sun-drenched living rooms or master suites, a standard Level 4 finish might actually look like a Level 2 during the sunset or sunrise. To combat this, we suggest the strategic use of Level 5 finishing in these high-exposure areas to ensure the surface remains visually flat throughout the day.
The Paint Sheen Framework
The glossier the paint, the more light it reflects, and the more it reveals what lies beneath. Use this framework to match your finish level to your desired paint:
- Flat or Matte Paint: These are the most forgiving options. They absorb light rather than reflecting it, making them suitable for Level 3 or standard Level 4 finishes.
- Satin or Eggshell: These popular residential choices have a slight luster. They require a high-quality Level 4 finish to avoid “flashing,” where the joints appear shinier than the surrounding board.
- Gloss or Semi-Gloss: These sheens act almost like a mirror. They absolutely require a Level 5 skim coat to prevent a “pitted” look that occurs when the paint highlights the natural texture of the drywall paper.
Darker paint colors also demand higher precision. Dark pigments absorb more light, which creates higher contrast between the highlights and shadows of a wall’s texture. If you’re planning a bold accent wall or a high-gloss kitchen, matching the right finish to your interior painting services is the best way to ensure a professional result that stands up to El Paso’s bright climate.
The MAK Advantage: Professional Drywall Services in El Paso
Many homeowners attempt to finish their own drywall to manage costs, but they often struggle with the “flashlight test.” This professional standard involves holding a high-intensity light source parallel to the wall to reveal ridges, pits, or uneven sanding that are invisible under normal conditions. While having the drywall finishing levels explained provides a helpful roadmap, achieving a consistent Level 4 or 5 result requires specialized tools and years of technical expertise. MAK Roofing and Construction Company brings over 16 years of local experience to every project, ensuring that your home additions and remodels look like they were part of the original structure from day one.
We recognize that a home addition is a significant investment in your property’s value. Our approach focuses on seamless integration between new and old surfaces. When we handle drywall finishing levels explained in our project plans, we specify the exact preparation work needed to match the existing texture of your home. Expert sanding is a hallmark of our service. We utilize professional-grade vacuum systems to capture dust at the source, which is a critical consideration for families residing in their homes during a remodel. This commitment to a clean workspace reflects our broader dedication to reliability and the long-term security of your interior environment.
From Framing to Final Paint
Our “More Than” philosophy means we act as more than just a single-service provider; we are your comprehensive project steward. This start-to-finish management style ensures that every technical detail is handled with precision. Our process begins with verifying structural stability before the first piece of tape is applied. If the framing isn’t square or the boards aren’t fastened correctly, even the most expensive Level 5 finish will eventually show stress lines. By using a single contractor for both drywall and interior painting, you eliminate the coordination issues that often arise between separate crews. We take full responsibility for the surface from the raw gypsum stage to the final coat of paint.
Start Your Home Transformation
Local expertise is vital because El Paso’s high-desert climate requires specific construction knowledge. Our team understands how the heat and low humidity affect the drying times of joint compound, which prevents the shrinkage issues that lead to visible seams or “flashing.” We provide a methodical, logical approach to every project, moving from an initial consultation to a flawless completion with a focus on durability and excellence. If you’re ready to ensure your next project stands up to the scrutiny of El Paso’s bright natural light, we’re here to help. Schedule your professional drywall consultation with MAK Roofing and Construction Company today!
Achieve a Flawless Finish for Your El Paso Home
Selecting the right surface preparation is the foundation of a successful remodel. Having the drywall finishing levels explained allows you to make strategic decisions based on your room’s purpose and lighting. Whether you need a functional Level 2 for a garage or a gallery-quality Level 5 skim coat for a sun-drenched living room, the technical details matter. A professional finish ensures your walls look seamless and durable for years to come. It’s about matching the effort to the environment to avoid common issues like flashing or visible joints.
MAK Roofing and Construction brings 16 years of El Paso construction expertise to every project. As an A+ rated team, we are specialists in high-end smooth finishes that stand up to the most critical lighting. We handle the entire process from the initial framing to the final coat of paint, providing a reliable and professional experience. Get a Professional Drywall Estimate for Your El Paso Remodel and start your project with confidence. Your home deserves a level of craftsmanship that reflects your vision and stands the test of time.
Frequently Asked Questions
Is Level 5 drywall finish really worth the extra cost?
Level 5 is worth the investment if your room features large windows or you plan to use dark, high-sheen paints. It provides a premium, uniform surface that eliminates the visual difference between the drywall paper and the joint compound. While it costs more in labor and materials, it prevents the frustration of seeing “flashing” every time the sun hits your walls. For a standard bedroom with flat paint, however, Level 4 is usually sufficient.
What is the difference between a Level 4 and a Level 5 finish?
The primary difference is the addition of a full skim coat across the entire wall surface in a Level 5 finish. In a Level 4 finish, the joints and fasteners are covered and sanded, but the rest of the drywall paper remains exposed. Having these drywall finishing levels explained helps you see that Level 5 creates a single, non-porous layer. This ensures that paint absorbs at the exact same rate across the whole wall.
Can I paint directly over a Level 3 finish?
You shouldn’t paint directly over a Level 3 finish if you want a smooth appearance. This level is specifically prepared as a base for heavy textures like knockdown or orange peel. If you apply paint without texture, the joints and fastener heads will remain visible through the coating. To achieve a smooth look, you must advance the wall to at least a Level 4 finish before opening the paint can.
What happens if I use high-gloss paint on a Level 4 finish?
Using high-gloss paint on a Level 4 finish often results in a “pitted” or uneven appearance. High-gloss sheens act like a mirror, reflecting light off every minor variation in the wall’s texture. Because Level 4 doesn’t have a skim coat, the different textures of the paper and the mud will be obvious. For any sheen above satin, we recommend upgrading to a Level 5 finish to ensure a professional result.
How long does it take to achieve a Level 5 finish compared to Level 4?
A Level 5 finish typically requires an additional 24 to 48 hours of project time compared to Level 4. This extra time accounts for the application of the full skim coat, the necessary drying period, and a final meticulous sanding stage. While it extends the schedule, the result is a gallery-quality surface. Understanding the drywall finishing levels explained in your contract helps you plan your remodeling timeline more accurately without rushing the crucial drying phases.
Does the type of drywall mud used affect the finishing level?
The type of joint compound significantly impacts the quality of each level. Professionals often use a heavy-duty all-purpose compound for the initial taping and bedding coats because of its superior adhesive properties. For the final finish coats in Level 4 or the skim coat in Level 5, a lightweight topping compound is preferred. This material is easier to sand to a fine edge, which is essential for creating a truly seamless transition between joints.
Can a Level 5 finish be achieved through spraying instead of hand-troweling?
Level 5 finishes can absolutely be achieved through specialized spray applications. Many modern contractors use high-build primers or sprayable skim coats that are applied with an airless sprayer and then smoothed with a wide blade. This method can be more efficient for large commercial spaces or expansive residential additions. However, it still requires expert technique to ensure the thickness is consistent enough to provide the required uniform surface.
Why do my drywall seams show up only at certain times of the day?
Drywall seams often become visible only at specific times due to “raking light,” which occurs when sunlight hits the wall at a sharp angle. In El Paso, this usually happens during the early morning or late afternoon. The low angle of the sun creates long shadows across even the smallest ridges or dips in the joint compound. If your seams are visible during these hours, it’s a sign that the finish level wasn’t high enough for the room’s lighting.